
Use This Incredible Drill To Hit Every Club Longer
Oct 06, 2025Transcript Summary-
Hey everybody, Danny Maude here. You’ve probably heard the phrase practice makes perfect, but the truth is, practice makes permanent — so if you’re practicing the wrong things, you’re just grooving bad habits into your golf swing. I see it all the time, especially with players who slice the golf ball or struggle with solid contact. That’s why in this lesson, I’m going to share three simple drills you can do in just six minutes a day. These drills will help you understand how the body should naturally move — how to wind up in the backswing, how to transition smoothly into the downswing, and then how to blend it all together into a flowing, effortless golf swing.
Now, if you’re new to the channel and this is one of your first golf lessons with me, consider subscribing. I release videos like this every single week to help you play your best golf. And don’t worry — everything I share is also included in a free downloadable practice guide you’ll find in the description below.
Alright, let’s dive into drill number one. I recently gave this to a student of mine, Paul. Like many golfers, Paul was turning everything in his backswing — his knees, hips, and shoulders all moving together. It looked fine, but there was no resistance, no power. The key here is learning to load your trail leg. Imagine your zipper turning into your trail leg — you’re creating resistance, not just spinning everything away. This simple move stores energy in your right leg, giving you something to push off in the downswing. Spend a couple of minutes a day just feeling that — resist the urge to let the knees and hips spin too freely.
Drill number two is all about the transition. All great players move forward before they start to turn through. What most amateurs do instead is spin their hips immediately and lose power. So from that loaded trail leg, I want you to feel your zipper move into your lead leg before you turn. Keep that trail heel grounded and feel the push from the ground up. This helps you use the legs properly, creating space and a more powerful impact position.
Once you’ve got those first two drills, we move to drill number three, where we blend everything together. This one’s a little more advanced, but it’s what ties your swing into a smooth, effortless motion. You’re simply training the feeling of loading into your trail leg, moving into your lead leg, and then returning your body back to a balanced, athletic position — almost where you started at setup. From here, you can fire through impact naturally without spinning out or sliding underneath.
Look, these drills might seem simple, but they’re powerful. They give you the feelings your body needs to move correctly — and those feelings are what make all the difference on the golf course. Watching videos is great, but it’s the doing, the feeling, that builds real skill. Practice these movements for a few minutes each day, and you’ll start to sense the effortless power the best players create.
If you enjoyed this video and think it could help someone else, give it a thumbs up and share it with a friend. And if you’d like to see a personal lesson I had where I was working on similar concepts with Pete, check out the video right here — it’s one of the most popular on the channel. But until next week, have a wonderful golfing.
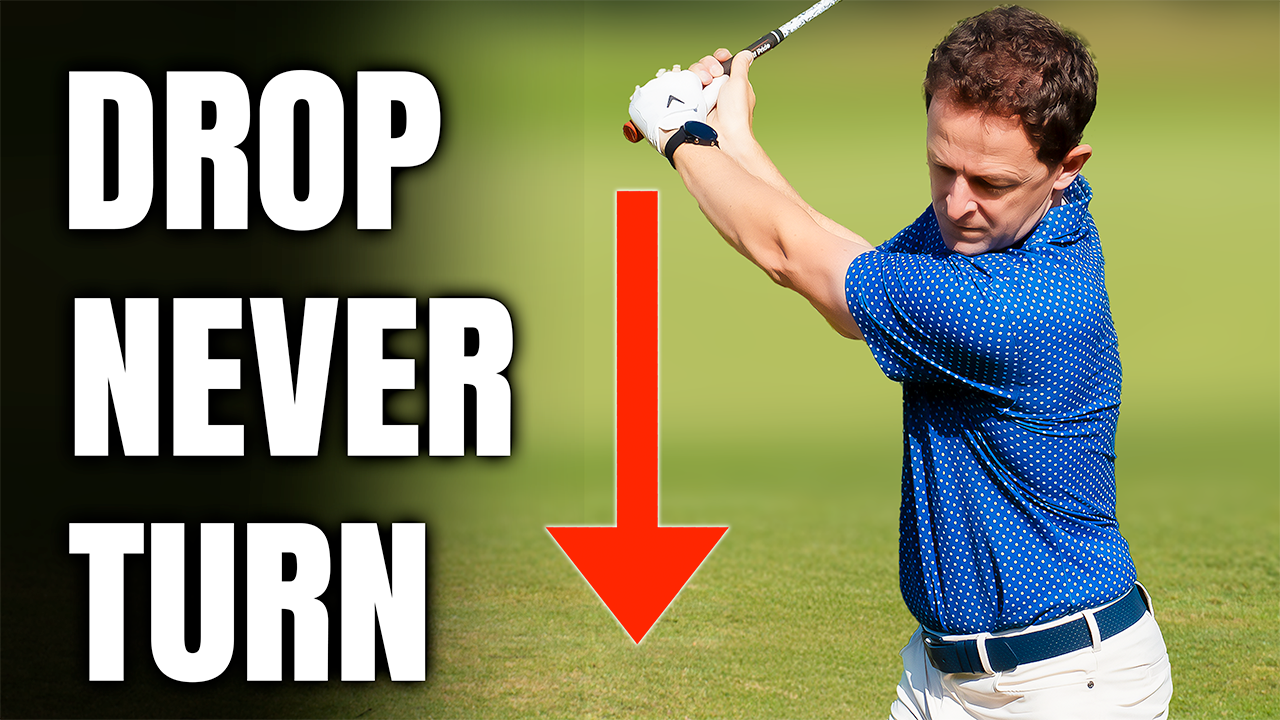
Alright, so if you want to become a consistently great ball striker with every club in your bag, the first thing you’ve got to realise is that the golf swing moves on an arc. It starts low, works around the body, comes back down on that same arc, and then through and around as we rotate through. Now, what I’ve noticed this week with so many of my students is how important your trail arm—your right arm for right-handed golfers—is in controlling that arc. Most golfers simply don’t know how to move it properly or even where it should start, and without that understanding, it’s almost impossible to create a consistent strike.
In this lesson, I’m going to show you exactly where your trail arm should start, how it folds to the top of your backswing, and, crucially, what it should do on the way down—just like all great ball strikers do. Once you understand this, you’ll find it so much easier to rotate through impact, strike the ball cleanly, and hit more consistent shots whether it’s with your irons, fairway woods, or even your driver.
Now, the key to great ball striking is keeping that trail arm in front of your body. If it drifts behind, you lose strike, direction, and power. Start by setting your trail arm correctly at address—turn your arm slightly as if you’re giving blood so that the elbow points more downwards and sits close to your body. Then grip the club from there. That simple setup puts your arm in front of your body, ready to work properly throughout the swing.
From there, one of my favourite drills is to hold your tricep with your lead hand. This keeps the trail elbow pinned in place so it can’t drift behind you. When you make a few swings like this, you’ll feel how the right arm works—almost straight up and down, not around you. The arm’s job is to move the club up and down; your body rotation moves the club around you. This combination puts the club in a fantastic position at the top and allows you to deliver it beautifully back into impact.
At the top of the swing, you’ll notice the trail arm sits underneath the club, the wrist slightly bent back—almost like carrying a tray. This is key because when you bring the club down, you maintain that structure and can compress the ball at impact. If the elbow drifts behind, the club gets thrown out early, and you lose all your power and consistency.
To really train this, I’ve got two simple drills you can do anywhere. The first is that tricep hold—just keep the elbow stable and feel how the arm moves naturally up and down. The second is the split-hand drill. Hold the club with your hands a few inches apart, then make a small swing, letting the trail arm fold up and then fall straight back down in front of your body. From there, rotate through, and you’ll feel that beautiful, compressed strike without forcing anything.
If you’re someone who struggles with flexibility—maybe your elbow can’t quite get in front of your wrist when you hold your arms out—that’s okay. You can still make this work. Just be careful not to let the wrists flick or the club roll over early. Instead, feel like you’re pitching the club back over your trail shoulder with your wrists while keeping the club behind your hands. That keeps you in a strong position to compress the ball, even if your elbow sits a bit wider.
So to summarise, your right arm’s job is to work the club up and down while your body turns it around. Keep it in front of your body, let it fold correctly going back, unfold naturally on the way down, and rotate through. You’ll find you’re striking the ball cleaner and more consistently with every club in the bag.
And if you’d like to see me put this into practice in a real lesson with one of the best coaches in the world, Pete Cowen, check out the video right here—it’s had over 4 million views and nearly perfect feedback. And remember, I’ve put a free practice guide in the description box below so you don’t have to remember a thing. Have a wonderful golfing week, and I’ll see you next time!
Full Transcript- So if you want to be a consistently great ball striker with every club in the bag, you need to recognize that the golf swing is an arc. It starts down here. It works on an arc around our body. It comes back down on on on an arc and then comes through and then we rotate through on this arc. Now what most people are aware, certainly was my experience this week with my students is your right arm, your trail arm is so so important and most people don't know how to move it correctly. They don't even know where it's supposed to start. Without knowing this, it makes it very, very difficult to create this consistent arc in your golf swing. In this golf lesson, what I want to do is I want to share with you where this trail arm is supposed to start in your golf swing, how it folds to get to the top. And then really, really important, which is what all great golfers do, know what you're supposed to do on the way down. So, the club's in a great spot here so you can rotate beautifully on the ball. create that beautiful strike and naturally hit the ball more consistently. That's what I want to cover in this video. And it works. Whatever we do here, it will help you hit driver straight and strike your fairway woods. So, I can't wait to share it with you. Before I do, though, look, if you're new to the channel, it's one of your first lessons of mine. Please consider subscribing. I release videos just like this one every single week to try and help you improve your game. Plus, you never have to remember a thing. Everything we do here, I'll put into a free downloadable practice guide in the description box below.
So, if you'd like to start hitting more consistent golf shots like that with your irons, with your fairway woods, and with your driver, it's really important to get control over your trail arm, my right arm, in the golf swing. So, how do all great ball strikers move this trail arm? So, so valuable. Well, the key is this. This trail arm for them is basically maintain. It's always in front of the body here. This would be to the side. This would be behind. Yeah. Like this. This is no good where the trail arm look is in front of the body almost in front of my my trail hip like this. What this does is when we get to impact, it helps us to keep the shaft slight leaning forward here. It helps us to compress golf shots off the ground. It also like almost like throwing a ball. It is a very powerful way to hit a shot. If we start to get like this position here where this the club gets ahead and the arm starts to drift outwards and away from our bodies here almost behind our bodies, that's when we start to kind of unfortunately lose your strike. You lose your direction and you lose a huge amount of power. So, what I'd like to do now is show you how you can naturally start to get this trail arm into the correct place much much more consistently. So the first thing I want you to do is make sure at least that you're starting with your trail arm in the correct place. A lot of people, you know, just naturally don't do this. So a lot of players this week I see where this trail arm here was almost the elbows angled outwards this way. And when you do that, the problem is is now suddenly the elbow already at the start of your swing. Look, is almost to the side of your body. Make sure look you turn your arm like you're almost giving blood here. So the elbow starts to point more downwards. And look, it's moving closer to your body. Then turn the hand to grip the golf club. If you do that, now your trell arm right at the start is in front of your body. Fantastic. The next thing is to then, well, how do you keep it there throughout the entire golf swing? Well, this drill really, really helps my students. So, I get them to hold their tricep, right? And what I'm doing is I'm pinning the tricep to the body so that this the elbow here does not move. It stays exactly here. Most players allowing this elbow to drift to the side of their body and drift behind them. Every time you do that, watch what's happening. That's right. The arms moving to the side. Now we're into flick territory. We've got to figure out how we keep that elbow much closer in the same place every time so that we can create the strike we talked about. So hold the tricep, make a few goal swings. And notice here my elbow's not moving whatsoever. And what do you notice about the what my right arm is doing? It's not going backwards at all. It's almost just working up, isn't it? Upwards up. It's just going vertical upwards. And what happens on the way down? He just pretty much goes vertically downwards. This is the role of your right arm in the golf swing. And it's vital you kind of understand this. The role is to take the club here. We get the swing backwards and forwards. The right arm is rolling to take the club upwards. What our bodies do is take the club around. You see that? I'm in a great position here. That club has moved around the corner, not because of anything I've done with my right arm, but because I've moved my body. Now, this is the next stage, which is hugely important. From this position, what do you notice about my trellam? It's underneath the golf club. My right wrist here is almost bent back a little bit here. Again, supporting the club almost like a little waitress tray to a certain degree. Okay. Now, this is important because look, it means that when I come into impact, as I move this back down into impact here, as I move this down, as I'm coming through and I rotate, I've still got, look, this arm in front of my body and I've still got a nice angle here to really compress the shot. I haven't thrown those angles away. If I pull my arm behind me now, suddenly, if I brought the the club down, you can see I'm in a really, really poor position. So, how can you go go about working on this? So, super simple. And I've got two drills that will give and you can do them in the comfort your own home just to learn the feel of this. Well, we said, look, you've got to start first of all with the elbow in the correct place so it's in front of your body. The next thing, as we said, hold your tricep, lock that joint in here, so it can't move side to side, right? So that you get the feeling as you swing the club freely. I'm not trying to hold on to any angles here. My wrists are relaxed, my arms relaxed, and I'm getting the feeling here of how the club or my arm or the rotates around that elbow joint, right? It's just working up and down. There's no such thing as this. And this is what my students struggle with. They often try to cheat this when we do it by dragging it around. Please, please, please lock it in position. Do it in front of a mirror to start with. Yeah. So, you can feel how this trail arm works. Then you can see here as you then turn, just get the sensation now. Look of look, I then moving this this way. I all my trail arm does it just simply just naturally unfolds down in front of my body. What then takes the club around is simply look the turn. And you can see here, look, I haven't tried to drive my handle ahead. I haven't tried to hold any angles. All I'm doing is allowing this to fall naturally. Add the rotation to this. And I've naturally got this kind of compression, all the powerful motions you want without even trying. Right? And that's the goal I want you to want it to be super super simple. So start with that first motion. The second thing which my students love is the split hand exercise with this. Hold the club, split the hands. So there's a good maybe your distance here what your trail hands on the on the side of the shaft. Now from here what I want you to do, you've now got the trail arm in front of your body. You make a swing here and you allow the arm. Now remember the arm is just simply folding upwards here this way. Right? Now from this position here, all I want you to do is fire that club straight down. Look back in front of your trail leg. So you're gonna it's basically up down. So you're really feeling that trail arm back down in front of the leg. Why I love that from here all you're going to do from this this position here is simply rotate onto the shot and you've got compression. At no stage am I trying to drive my hands forward, but I'm definitely not letting that trail elbow move out and create this kind of look here. So it's a great way here to help you to feel how this trail elbow folds. Okay. Super super simple. Let's grab this ball. I'm gonna hit a shot doing that. And then I'm going to show you really quickly what some of my students who don't have the flexibility to completely keep this angle. If they don't have that, which is probably half my students, I do something else. I'll show you that in a second. So, let's start this in action. I've got the feeling here, and this is how I'd work on this. Really sense that that trail elbow is going up, falling down. It's almost like you see Justin Rose doing this motion here, falling down the body here, and then we're rotating onto the shot. It's really an up and down motion of the arm here and then just rotate beautifully onto the shot. It feels just really really simple.
Just simple. I I feel I could repeat that over and over and over again. And that's exactly what my students are saying. It feels simple. But if you don't have if you don't have the flexibility to keep this elbow in and the way to check this real simple hold your arms out in front of you here and you should be able with this trail side to get your elbow in front of your wrist here. Really important. Half my students can't do this. They'll be about uh they'll be like this. So the question is if your elbow is like this and you can't in in a sense keep this club like this and your elbow's doing this. Don't let the wrists push it this way. What you have to do is that's fine. Leave it. You got to work with your flexibility. Just make sure you get the feeling look of the wrists pitching the club over this trail shoulder. So you're going to keep the club planed like this with your wrists. Look at this here. Look. So, if you got elbows out here and because of flexibility and you feel like it's a bit more there as opposed to underneath, not a problem. Just don't let that flick it over here. Pitch the club with your wrist as you just felt there. Keep it there because now look, when you fire it down, even though the right elbow's not in right right place, you're still in great shape. Look, still to create compression. So, just to repeat that, this can cause this. Don't let that happen. Simply just playing it with your wrist. you're using your wrists instead to keep that club behind the hands so that you can create that feeling of compression. Super super valuable. So, understanding how this trail arm works, start off with it, well, understand how it folds and works the club up and down. And it's the body look that takes the club around. Same on the way down. It's the downward motion and unfolding of this trail arm and it's ultimately the turning of the body that in a sense squares at the club face, the compression and the motion. And there's no attempt to me to drive that handle forward. I am simply unfolding that position because I've I can do that because I've kept it in a great spot throughout the entire swing. This works for every single club in your bag. If you'd like to see almost me getting a lesson with this, something similar to this with with with one of the world's number one c one of the world's one of the best golf coaches in the world, Peak Cowan, check this video out right here. Over 4 million people have viewed it and it's got an almost 99.9% positive rate. Incredible. Check it out here. If you're new to the channel, press the subscribe button down here. And remember, I've got free practice plan in the description box below. But until next week, have a wonderful golfing.
